How to create/update Iphone contacts from incoming emails
Manually creating or updating iPhone contacts from incoming emails can be time-consuming and often leads to incomplete or outdated contact records. This guide explains how to automatically turn email signatures and email content into detailed contact cards containing names, phone numbers, company information, job titles, email addresses, and notes. Whether you use Gmail or Apple Mail on your iPhone, you’ll learn how to synchronize Google Contacts with iPhone, create contacts directly from incoming emails, share contacts, add notes, and keep your contact database up to date automatically.
• iPhone does not provide a built-in feature to automatically create full contact cards from incoming emails.
• By connecting a Google account to your iPhone, contacts created through Google Contacts can automatically sync to your device.
• Gmail users can use the Contacts AI Auto-Updater add-on to extract contact information directly from email signatures.
• Apple Mail users can create and manage contacts using the ContactsFlow™ mobile app.
• Contact cards can automatically capture names, companies, job titles, phone numbers, email addresses, and notes from incoming emails.
• Newly created contacts can be shared with teams through shared contact lists.
• Email interactions can be summarized and stored as contact notes to improve customer and relationship management.
• Contacts remain synchronized across devices, ensuring up-to-date information is always available.


In the era of AI and automation, creating or updating contacts manually feels like the stone age. Yet, Apple still doesn’t provide a built-in way to turn an email into a full contact card with just one tap or even by asking Siri.
The good news? There are solutions. Whether you use Gmail on your iPhone or prefer Apple Mail with iCloud (or any other email provider), you can now turn incoming emails into complete, detailed contacts with just a few clicks.
But no worries, there is a solution too.
In this tutorial, we will walk you through how to transform any email into a detailed contact where all the information such as name, company, job title, phone, email and even notes are filled automatically.
We’ll guide you through the process whether you are using Gmail on your iPhone or the Apple Mail app with any email provider.
Note that both methods require a Google account, so if you don’t already have one, you can easily create it here.
1.Synchronize your Google account with your Iphone
Because the updates are processed via your Google account, you’ll want to make sure all new contacts created there sync automatically to your iPhone, as explained in this tutorial that we have summarized for you in the following section.
To sync your Google Account with your iPhone:
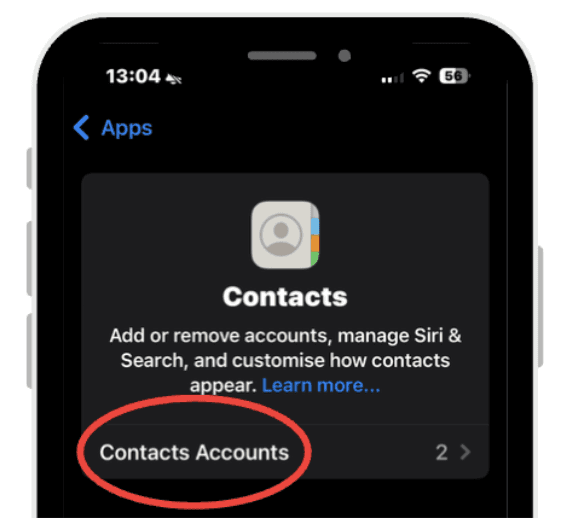
Go to Settings > Contacts > Accounts.
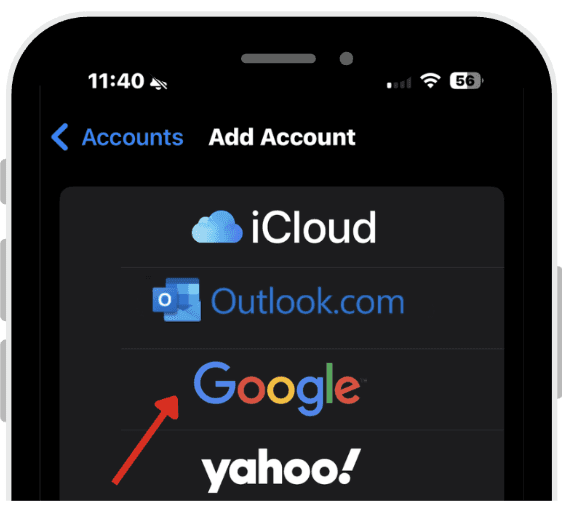
Tap Add Account
Tap Google
Sign in with your Google account and allow access
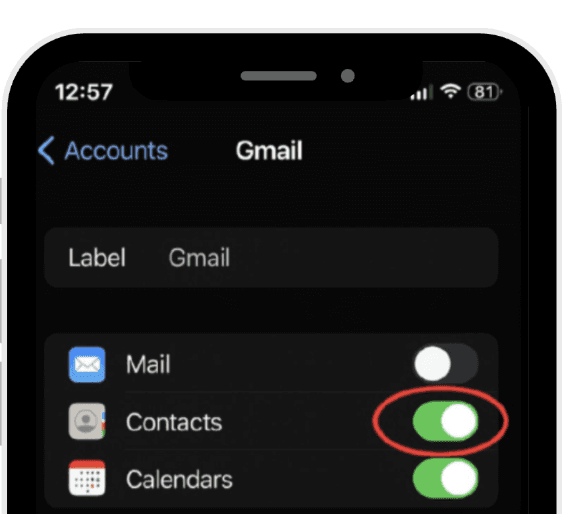
Once completed, in accounts tap Gmail and click on the sync toggles button to turn Contacts On
 |  |
|
|
 |  |
|
|
 | |
|
Now your Gmail account is successfully synced with your iPhone!
2.If you are using the Gmail App
If you receive most of your emails in Gmail, the easiest way is to use the Contacts AI Auto-Updater Gmail add-on.
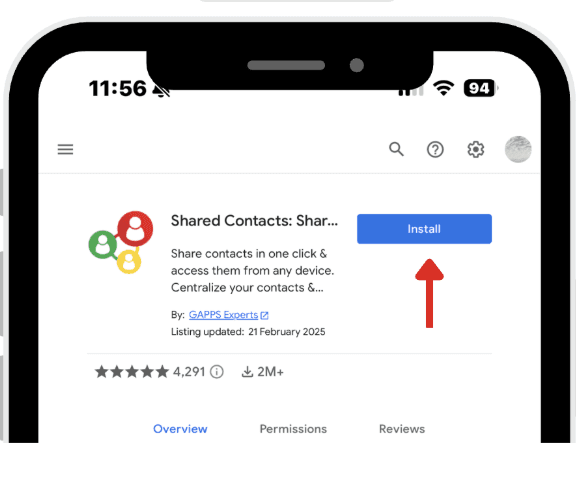
2.1. Install the Gmail addon “Contacts AI Auto-Updater” and activate the Addon
To install the Add-on:
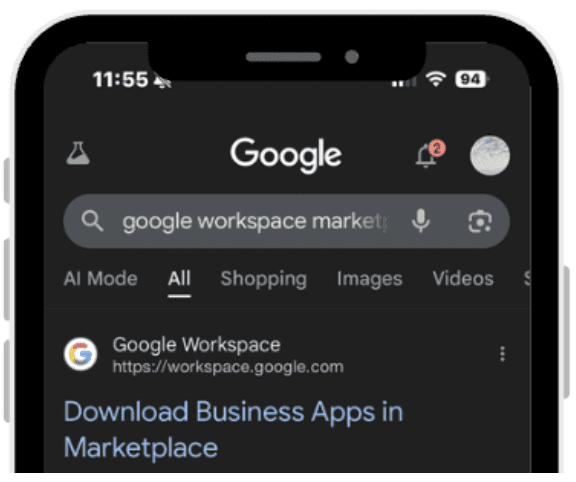
On your iPhone, open a browser and go to the Google Workspace Marketplace.
Install Contacts AI Auto-Updater
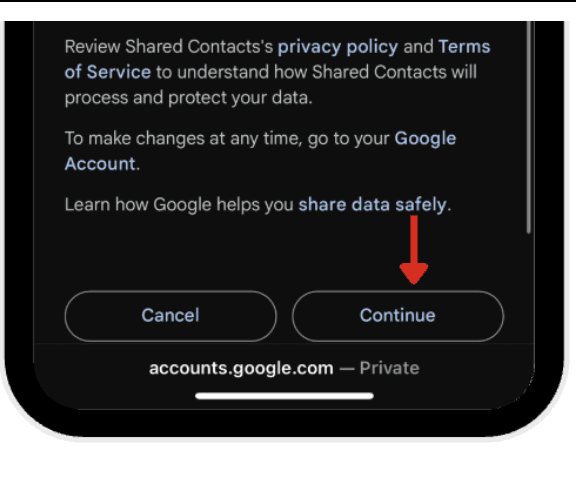
Once the installation is complete, you’ll be redirected to the Google sign-in page to grant Shared Contacts AI Auto-Updater permission to connect with your account. Click continue
 |  |
|
|
 | |
|
Now you can also choose to activate the app on your desktop or on your mobile
2.1.1. Activate on desktop and view contact card
To activate on your desktop you have to:
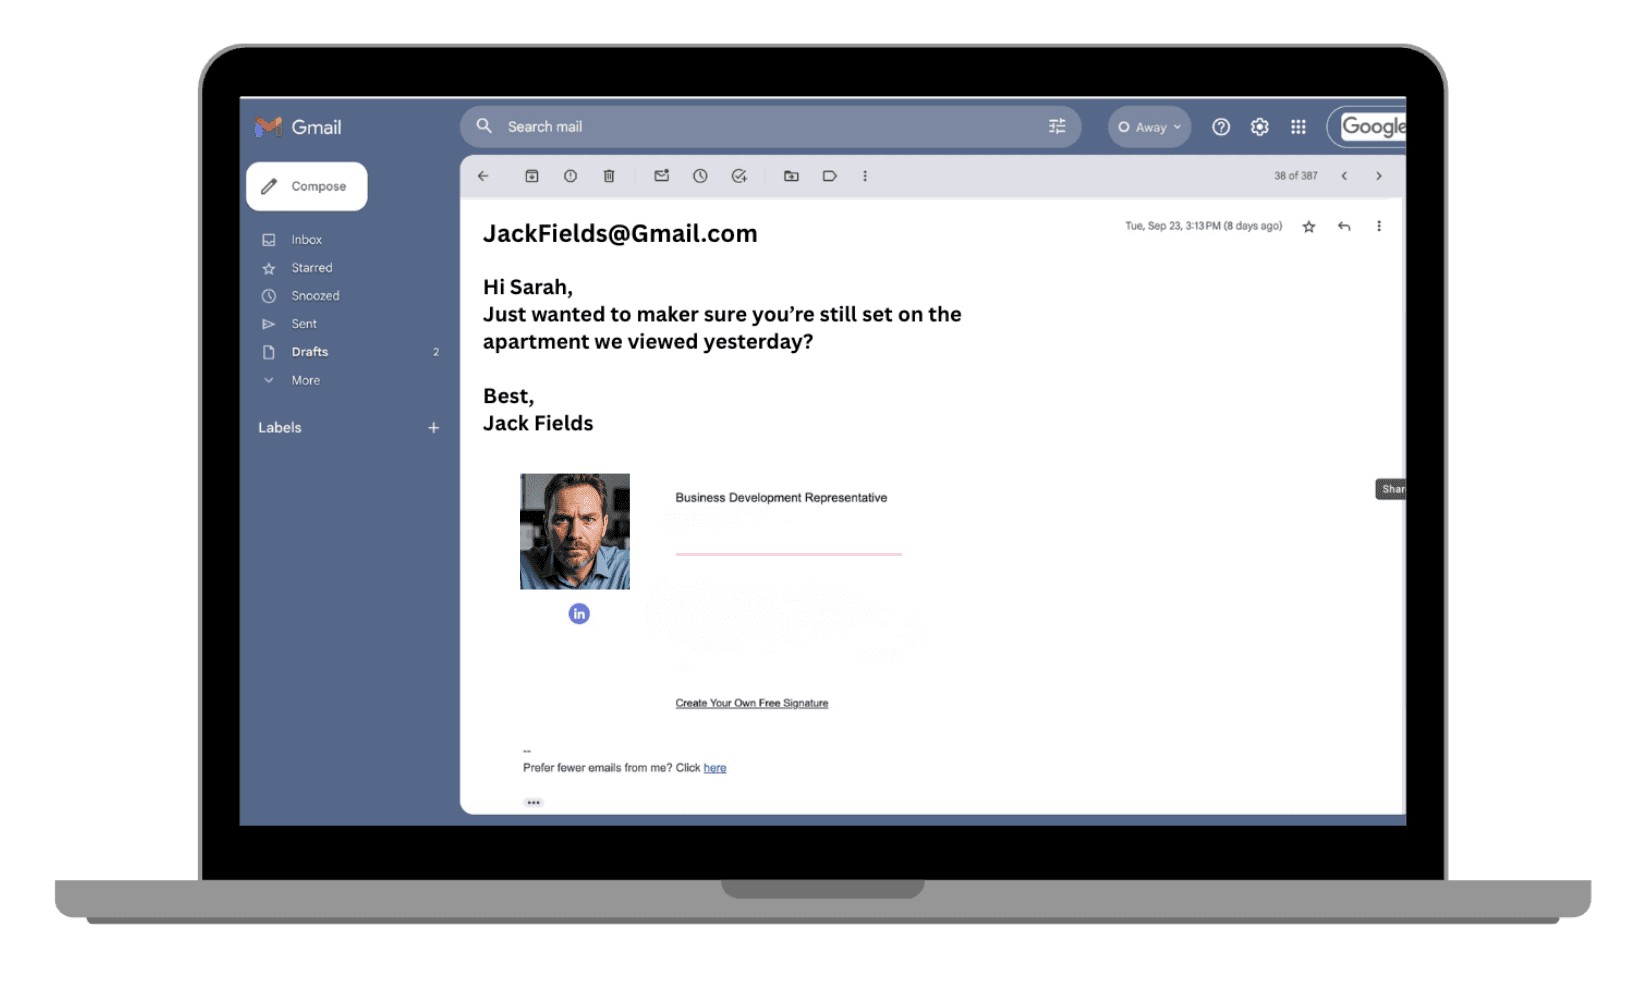
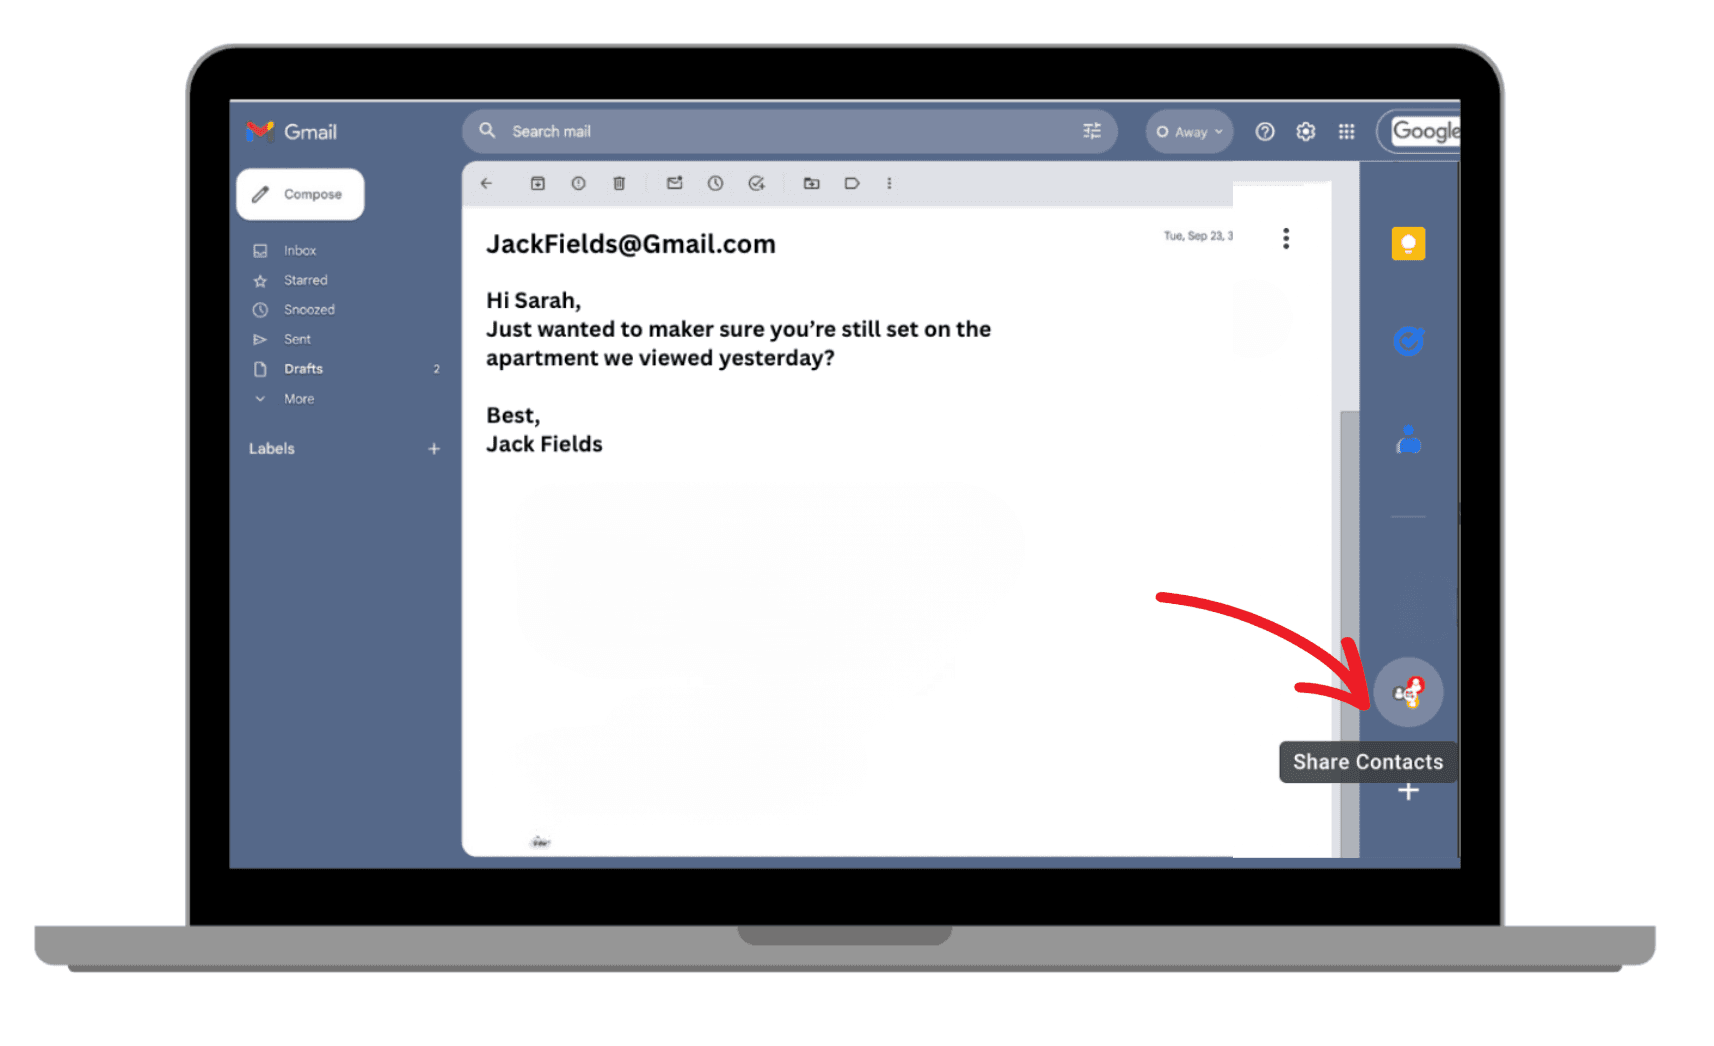
Open Gmail on your desktop, and click on an email
Click on the Contacts AI Auto-Updater Addon icon on the right bar
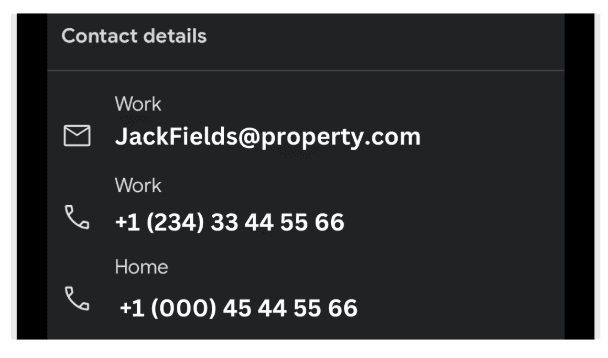
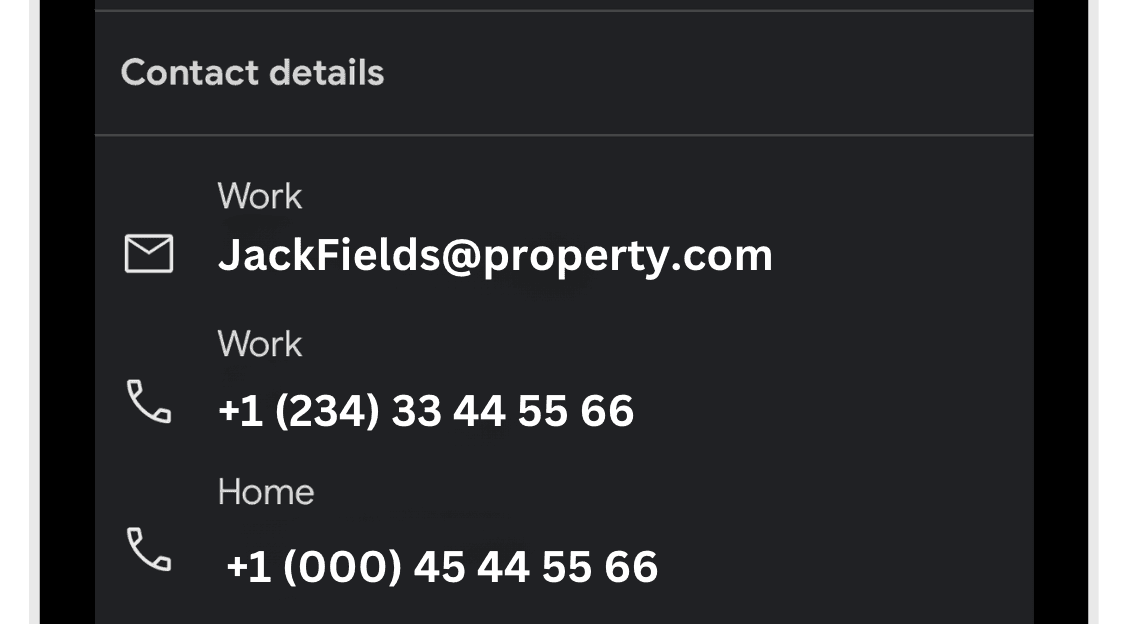
To view the contact card automatically created:
After tapping the icon, a contact card is created from the signature of the email. You’ll be able to see the sender’s contact details.
 |  |
|
|
 | |
|
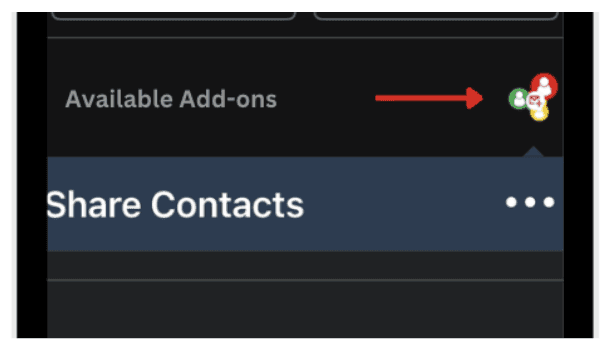
2.1.2. Activate on mobile and view contact card
To activate and see the sender’s contact card on your mobile you have to:
Open your Gmail account on your iPhone
Open an email and scroll down to see available Add-ons. Tap the Contacts AI Auto Updater icon.
To view the contact card automatically created:
After tapping the icon, a contact card is created from the signature of the email. You’ll be able to see the sender’s contact details.
 |  |
|
|
 | |
|
So now, whenever you receive an email with a signature or relevant details, just click the add-on button and:
The contact card will be created automatically.
The name, company, job title, phone, email, and even notes will be captured for you.
3. If you are using Apple Mail
Don’t worry if you prefer Apple Mail there’s also a solution for you
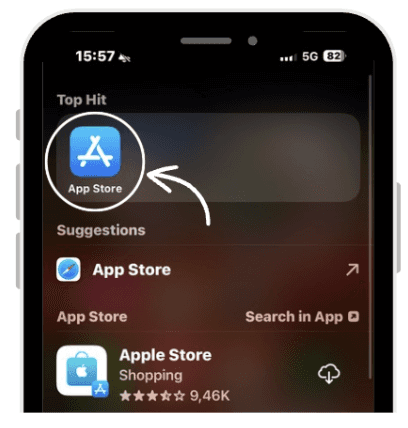
3.1. Download and sign up to Up to Contacts AI Auto Updater mobile app
To do this you:
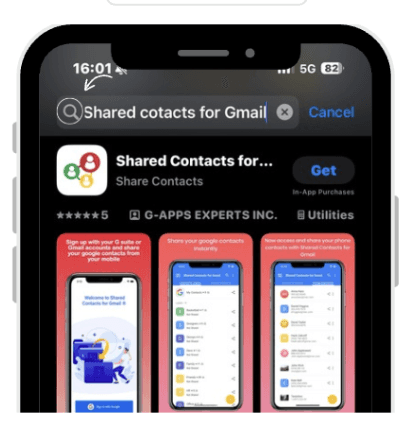
Go the app store
Search Shared Contacts for Gmail
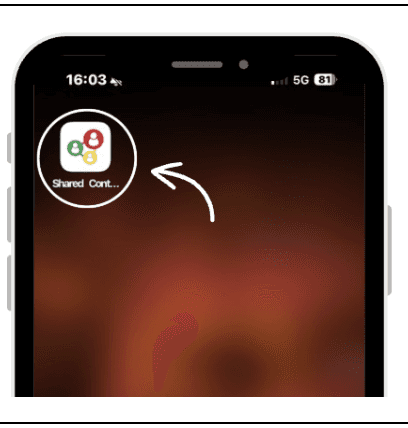
Open the application
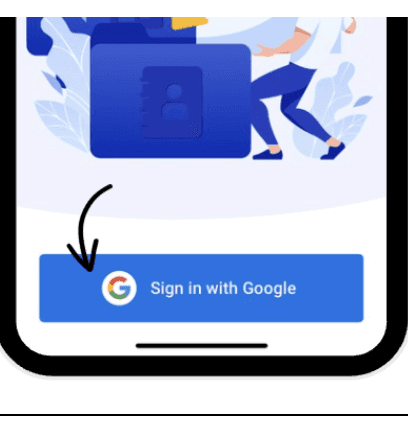
Sign in with your google account
 |  |
|
|
 |  |
|
|
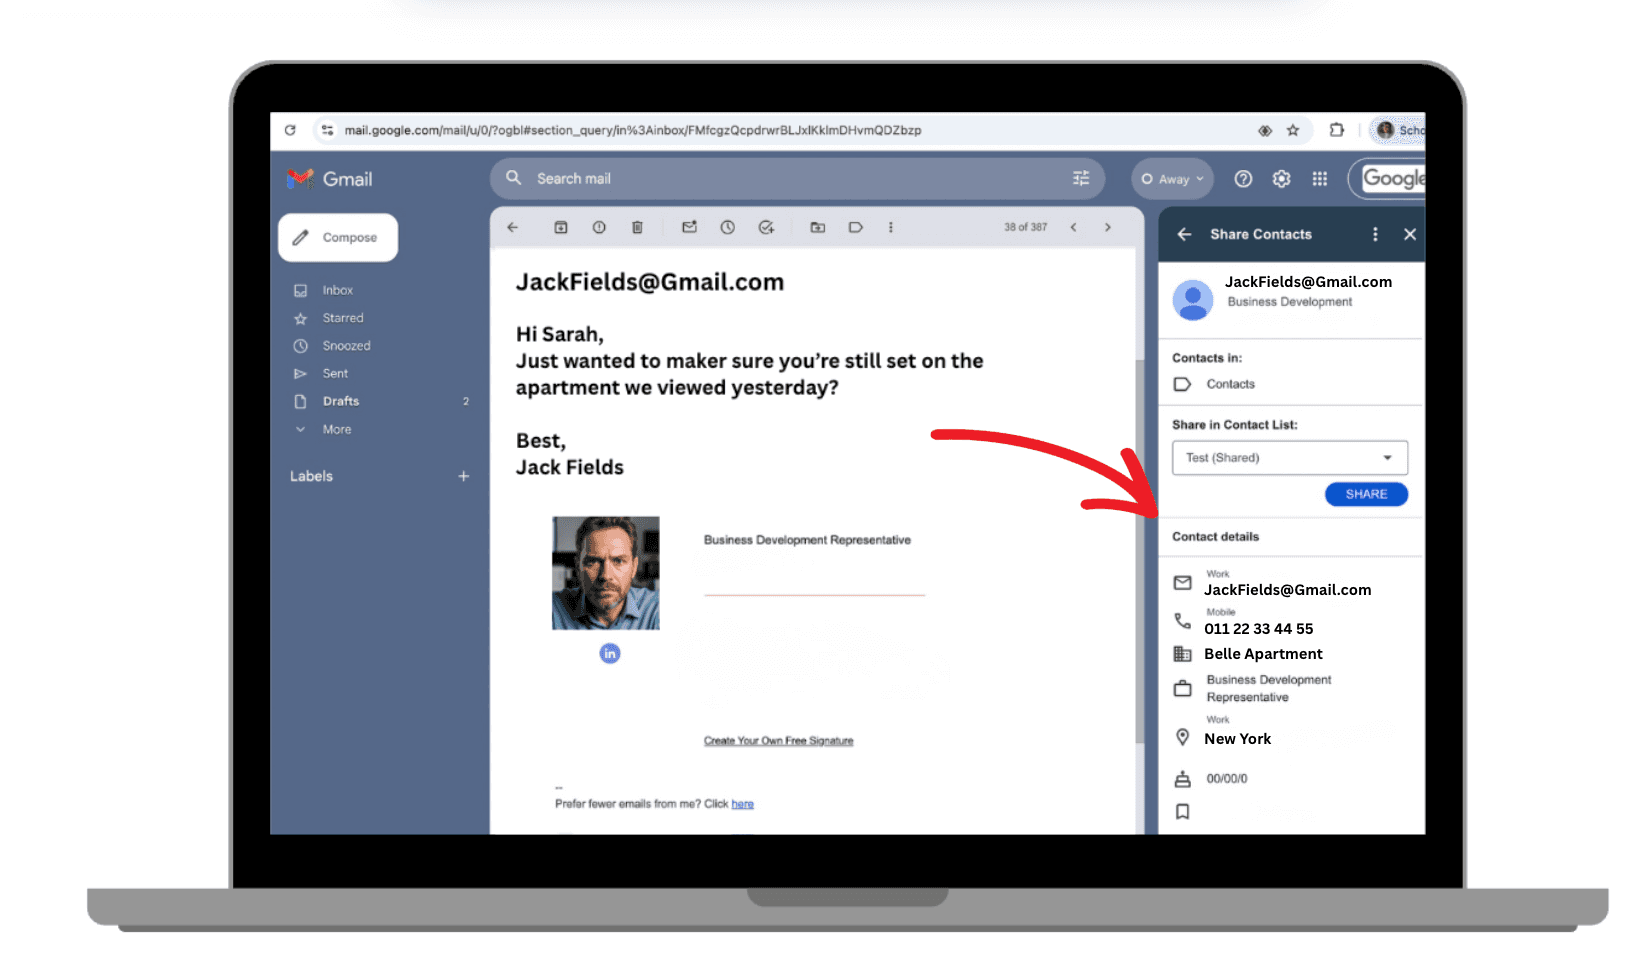
4. How to share the contacts added through email?
First you need to ensure that you have shared at least one contact list with your team.
4.1. In Gmail
To share contacts added through Gmail you:
Open your Gmail account
Tap the Contacts AI Auto Updater Addon.
After tapping the icon, a contact card is created from the signature of the email. You’ll be able to see the sender’s contact details.
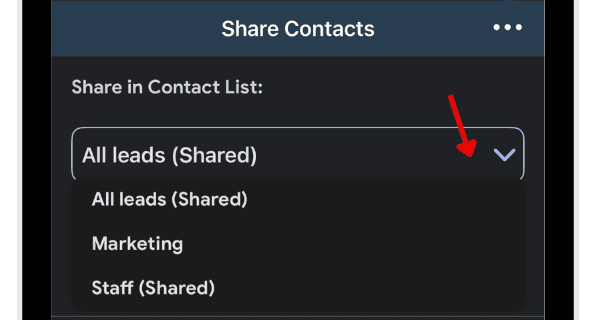
After the contact card is created, you can share the contact to another list by clicking the dropdown button and selecting the contact list you want to share the contact with.
| |
|
|
 |  |
|
|
4.1. In apple mail
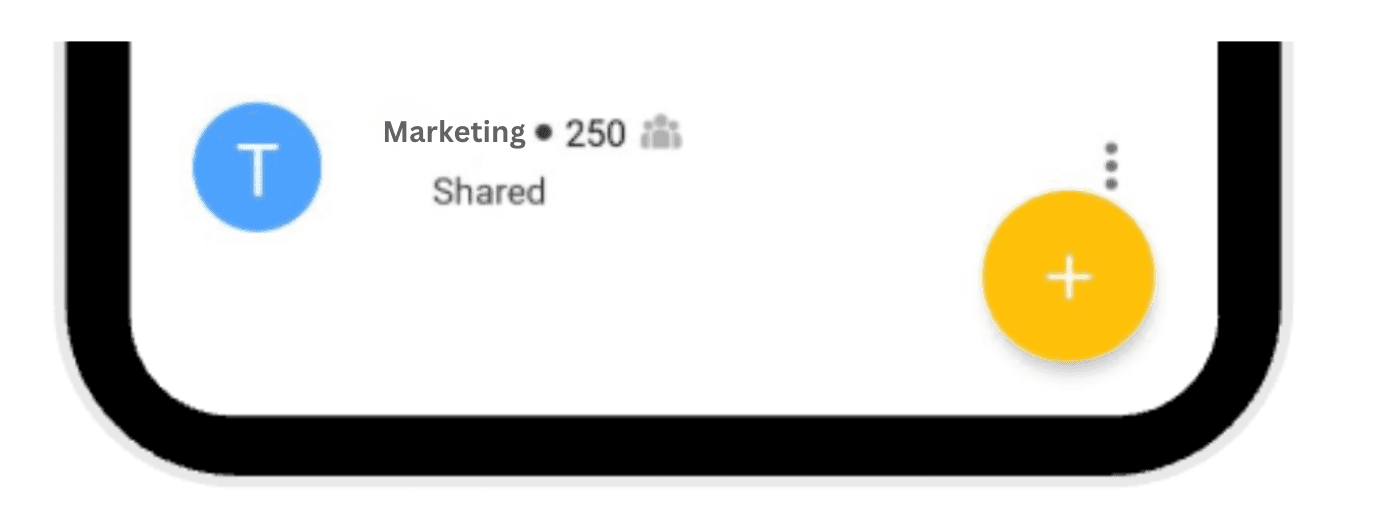
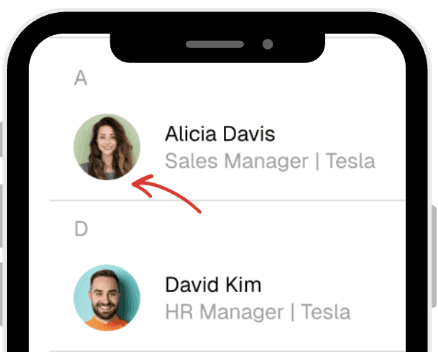
Open AI Auto Updater for Shared Contacts app
Find and tap on the newly created contact
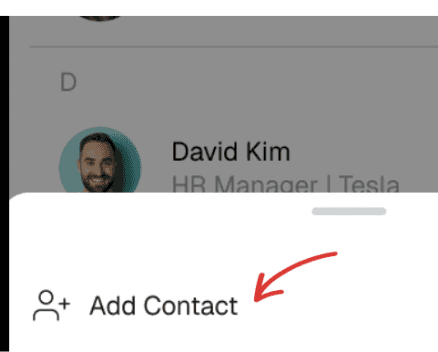
Click ‘Add Contact’ to the shared list of your choice
 |  |
|
|
 | |
|
Now your contacts with their full information details will appear in the shared list.
5. Contact notes
Each time you interact with a contact via email, Contacts AI Auto Updater can summarize key points and attach them as notes. But if you prefer or if you want to add more notes you absolutely could.
To add manual notes directly from Gmail:
Open your Gmail account
Open an email and tap the Contacts AI Auto Updater Addon
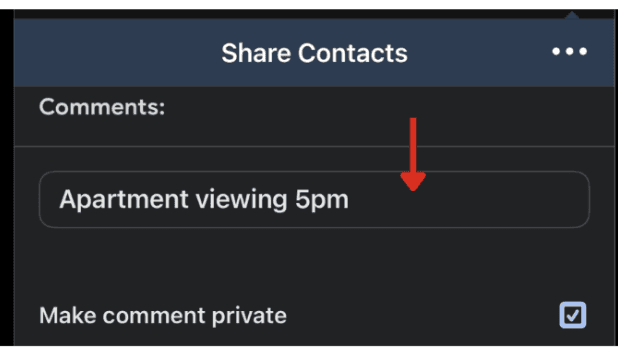
Scroll down and type your comment to the contact
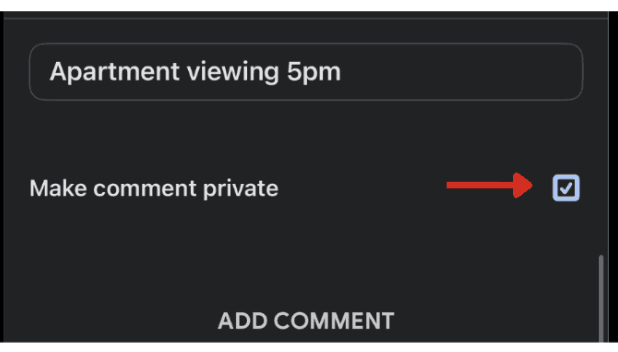
You can make the comment private by checking the ‘Make comment private’ box
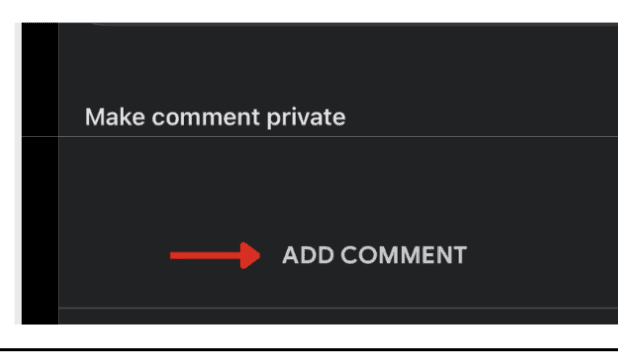
Save the Comment by clicking ‘add comment’, and it will appear under the contact
| |
|
|
 |  |
|
|
 | |
|
6. Security and Privacy considerations
It’s natural to ask whether it’s safe to allow a third-party app to read your emails. Here’s why it is:
No data storage: Emails are scanned only to extract contact information and are immediately deleted from server memory, so your data will not be saved in the server.
Strict certifications: Shared Contacts for Gmail is SOC 2 and PSI certified, among the strictest security standards in the industry.
Your data stays private, secure, and under your control.
There you go, updating iPhone contacts from incoming emails no longer has to be a manual chore. Whether you’re on Gmail or Apple Mail, you can now:
Turn signatures and emails into fully detailed contact cards.
Keep them synced with your iPhone automatically.
Share them with your team in seconds.
Track notes and updates effortlessly.
This way, you can create automatic contacts from email signatures, you never lose valuable contact information, and as a bonus, your entire team stays on the same page!
Leave a comment :
No comments yet. Be the first!


